The Ed Herbst Hopper – My vote for the best hopper pattern ever devised!

Initially I didn’t pay much attention to Ed Herbst’s hopper patterns, privately thinking they were unlikely creations for trout, too synthetic by far with foam body and rubber legs and Krystal Flash and way too involved to tie quickly. Besides, on the rare occasions that I fished hoppers I was always happy with flies like Dave Whitlock’s hopper,

the Letort hopper designed by Ernie Schweibert

or Joe’s Hopper, a neat Midwestern fly that looks very much like an Invicta with the wing tied flat and a hackle up front.

But as it turns out none of these patterns is quite as easy to tie as Ed’s and none or more effective in my view.

Fly tied by the hopper master himself, Ed Herbst
Interesting thing is few people get as fussy about exactly how their hopper pattern looks as they do say, about their mayfly or midge patterns. Hopper imitations seem relatively neglected in fly fishing, probably because most of us can’t see trout getting too fussy about the detail of a hopper as long as what’s presented is roughly the right shape, shows a bit of colour and is twitched occasionally.
Ed on his own Hopper pattern is interesting. He says the following and backs it up with two quotes:
‘My hopper was a foam version of the McMurray ant and was inspired by Art Lee’s assertion in his book that Sutryn’s ant pattern was the greatest dry fly ever invented. It was created in the nineteen sixties by Ed Sutryn of Pennsylvania and named after the town in which he lived. It proved so deadly that Sutryn patented the fly. I wanted to replicate the fly’s posture on the water and its slim waist using foam instead of balsa and to use golden pheasant tippet for a wing because this was a feature of most successful Australian hopper imitations.

As my pattern evolved, I incorporated the legs with thigh and knee as detailed in Tom’s book ‘Hunting Trout’. The rubber leg configuration, which combined two strands of rubber leg material of differing diameter and colour was based on observations by two leading fly fishing authorities, Gary Borger and Lefty Kreh. This involved knotting thick and thin strands of rubber leg material together and then clipping the thick ends away on either side.
The golden pheasant tippet wing was borrowed from Peter Leuver’s Banjo Hopper as described in his book ‘Fur and Feather’. Dozens of Aussie patterns have this wing and deceive countless trout so I figured this was a good bet. Adding fine rubber antennae at the eye was easy and improved the pattern’s attraction. Here are two quotes worth remembering when you design hopper patterns:

Leuver's Banjo Hopper
Presenting the Fly – Lefty Kreh
“I once lay on the bottom of a stream and had someone toss live grasshoppers onto the surface. Every hopper that came by had its legs protruding through the surface. For this reason I now only use hopper patterns that have legs.”
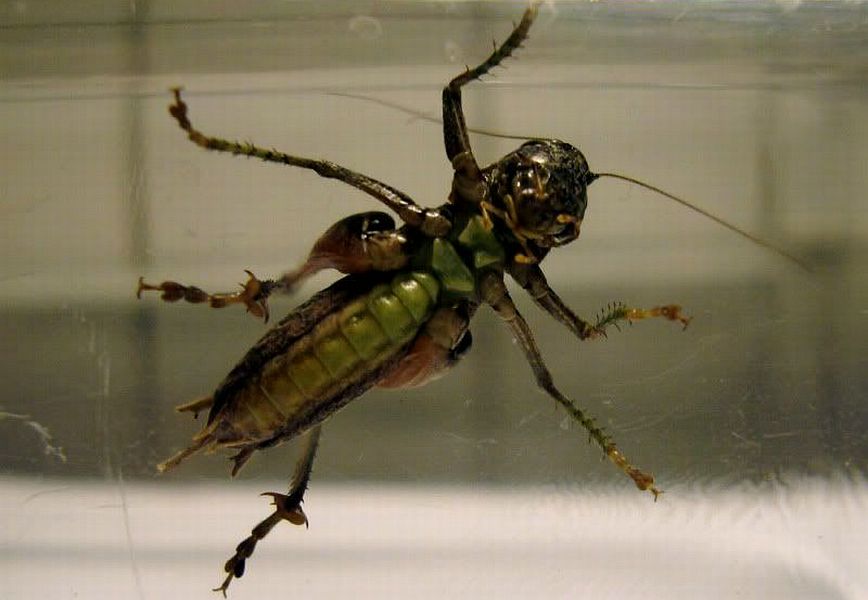
Picture via Ed Herbst by Peter Brigg
Designing Trout Flies – Gary Borger
“Those big hind limbs push well away from the body and become a prominent feature. When seen from underwater, the distinctive angle of these big kickers makes the insect look bow-legged.”
There are other features that make the original version of Ed’s fly, if not unique, at least pretty striking. The wing of Golden pheasant tippet is a rich orange, tipped and barred with jet-black. To bring in the touch of red, Ed runs two short pieces of maroon or red Krystal Flash (or equivalent) along the sides, though he’s also experimenting with rust colours rather than red. Add all this together and you have a very striking, very colourful, but more importantly, a very effective fly.
At present Ed and Andrew Ingram are busy filming a series of DVDs that promise to be the definitive works on tying South African fly patterns. All Ed’s latest thinking and further developments on his Hopper – and many of his other fly patterns – will be included in the DVD. I spoke to Ed today (Sunday 8 January 2011). He told me Andrew had spent the whole of the previous day filming him tying his hopper and ant patterns. For the DVD hopper he used Rainy’s yellow foam which he described as very soft and pliable and ideal for the body. He also introduced some novel ideas into tying the hopper’s legs, but we will have to await the release of the DVD to discover all these secrets! They are not sparing the horses in this DVD production and as usual Ed’s incredible understanding and knowledge of fly design and construction will become very evident. Other well known fly pattern developers have been, or soon will be, interviewed on the history, the art and the science behind their fly patterns. They will then be filmed tying their flies and in many instances, actually fishing them.
But back to Ed’s Hopper
MATERIALS:

Apart from the materials listed here you will need a tub of Superglue. Try to get the dispenser that comes with a brush. Trim the brush to a fine point with tying scissors. It’s also handy to use the tip of a dubbing needle to dispense the Superglue. You really need very little.
Hook: Use a wet fly hook, size 12, 14 or 16. If you use lighter dry fly hooks the fly tends to flip on its side due to the weight of the materials on the shank. The fly illustrated in this series was tied on a Grip hook, model 12804 size 14.
Thread: Danville or Uni-Thread 6/0 tan.
Body: Closed cell foam in yellow, orange, green or tan. You can trim your own body from a solid sheet of foam, or use a leather punch to press out the cylinder. Hareline’s Foam Cylinders in 1/16th or 3/32 nds of and inch are ideal, or you can cut a suitably narrow strip of yellow or pink/orange Lava Lace. However, according to Ed, Rainy’s Foam shows huge promise. See their amazing website at: http://www.rainysflies.com/foamproducts.php
Wing: Fibres of Golden Pheasant tippet.
Legs: Spirit River Tarantu-Leggs (fine or medium in tan, olive or black and white) or any equivalently patterned rubber legs.
Wing cover: Red Lureflash, or Krystal Flash, or equivalent.
(If you are unable to get all these materials from your local fly shop, Craig Thom of Stream-X tells me he stocks everything needed for this pattern and will provide it to you by mail order id required. See http://www.streamxflyfishing.co.za/index.htm.)
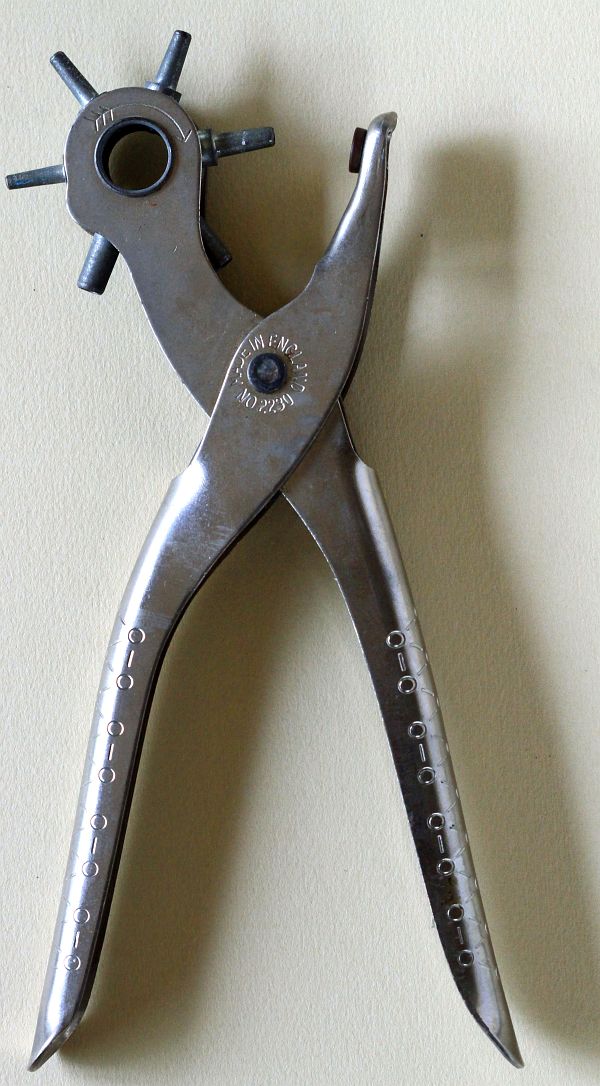
Valuable tool for making foam bodies - the leather punch
TYING SEQUENCE
1. Dress the hook shank with pale tan silk and put a small drop of Superglue on the wrappings about a third back from the eye (Without Superglue the foam body will continually spin around the shank and drive you quietly mad).

2. Settle a yellow, brown, green or orange cylinder of closed-cell foam on top of the glue to represent the abdomen. Anchor the body with a couple of firm turns of silk around the shank. The body should protrude beyond the end of the hook.

3. Tie in a second, short piece of foam for the head which should line up with the end of the eye of the hook. Leave a space between the body and foam head to tie in the wing and legs.

4. Now tie in the Golden pheasant tippet fibers in the gap between the two foam cylinders so that the tips protrude, but only just, beyond the end of the foam body.

5. Tie in one or two pieces of red Krystal Flash (or equivalent) along both edges of the Golden pheasant tippet wing.

5. Tying the rubber legs in takes a little practice, but aim to have two pieces of rubber out front to act as ‘antennae’, then one leg either side in the middle and two big legs trailing out the back. Tie in the two antennae first.


6. Knot a thicker and thinner section of rubber legs and tie these in as demonstrated in the schematic illustrations.

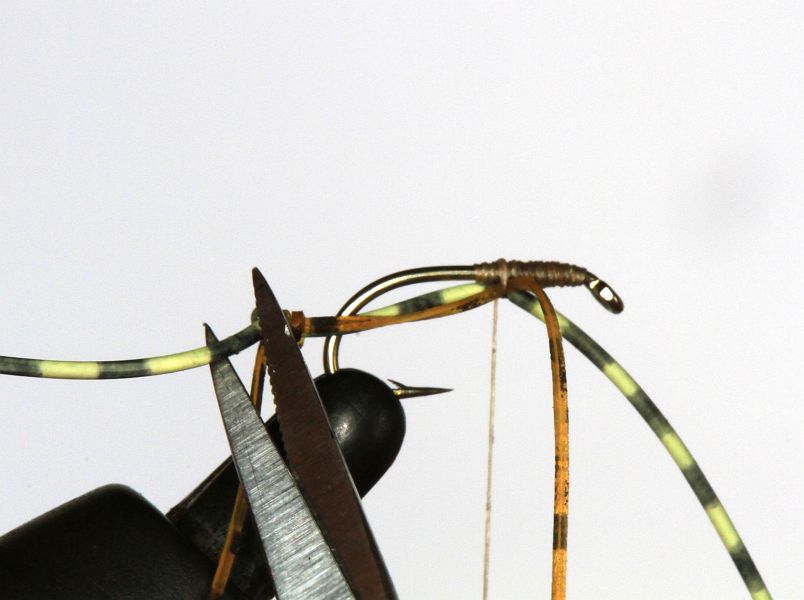

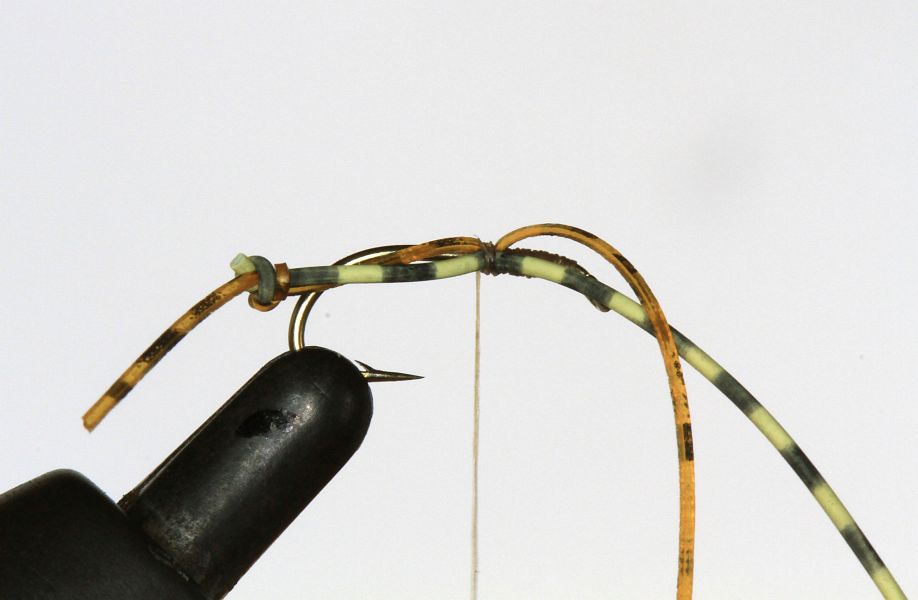


In the fly illustrated I have knotted thinner, softer tan rubber to a medium thick olive piece. I then trim off the thicker piece to form a ‘thigh’ and ‘knee’, leaving the thinner piece to protrude as the lower part of the leg. Trim the legs a little shorter than too long otherwise they will twist around the hook shank on every cast.
7. Take a black Koki pen and colour in two prominent eyes (another great trigger on hoppers) on either side of the head.

FISHING THE HOPPER


The triggers that induce trout to rise to this hopper are not located alone in the plump, elongated foam body. That’s attractive enough as a silhouette, but it’s common to most hopper designs. The rubber legs, I suspect, make the real difference. These are mottled and as you fish this hopper, say on a dead drift in a quick run, the legs will be moving, especially when you give the fly some action with rod tip. This is often an irresistible trigger to fish and it’s one of the powerful features of Ed’s pattern, the one feature that lifts it above most others.

We never imagine trout rising selectively to hoppers because hoppers rarely land in the water, so when one does, it most often gets taken boldly without a second thought. The arrival of any terrestrial on the water is an opportunistic meal and trout are programmed to respond accordingly and often show little restraint or finesse. They might gently sip mayflies or slowly gulp spinners and midges, but they smack grasshoppers.
If all this is so, then why don’t we fish hoppers more often than we do? I mean if the trout find them so irresistible why they aren’t the most used pattern on earth is a puzzle.
It may be that our imitations so far haven’t matched the naturals that well and maybe trout are a lot more discerning about hopper patterns than we give them credit for. Particularly, I suspect the triggers that actually induce takes on hoppers are imperfectly understood and it’s also likely, seeing as most anglers don’t use hoppers that often, that we don’t know how best to fish them, so the yield per cast is not encouraging. It is also likely that fishing freestone streams in an upstream direction we aren’t easily able to impart the necessary twitch. This suggests that we should realign our hopper presentations to make them far more across stream and even downstream. It also suggests we should be searching out flat spots in a run, especially near the bank, where we can induce a noticeable twitch.
The nice thing about fishing this pattern is that the foam floats it. But in mildly turbulent freestone streams the foam gradually soaks up water and the fly sinks lower and lower until it’s really hard to follow. Lightly greasing the pattern with a gel floatant helps.
The obvious time to fish hoppers is when you see hoppers around on riverbanks, which will usually be on warm to hot days and usually on streams with grassy banks, but the truth is the hopper is a perfect prospecting dry fly, maybe even an excellent attractor dry fly, especially for the middle of the day when things may have gone a little sad and still. And all the better if the wind is up because then you can bet that the odd hopper is going to land in the water.
Free drift the pattern through likely runs and get some drifts tight against the banks. Again, if you are getting takes, well and good, but if not, gently twitch the hopper with rod tip movement. In slow, slack water a gentle twitch is a killer on rivers and on lakes.
I have seen Ed Herbst take good fish from stillwaters with his hopper and it makes sound sense, especially fished along the edges on windy days, or off the wall. Also, just because you’re fishing a lake doesn’t mean that you need a bigger pattern. Size 12’s and 14’s do very well. I’d guess that if there was one fly pattern that’s totally under-cooked on lakes it’s the hopper. Ed has proved it to me more than just once.
***

