THE PHEASANT TAIL NYMPH or PTN
Tying the original Frank Sawyer pattern
This fly was described by Oliver Kite as one of the most effective nymph patterns ever devised. Oliver Kite was an outstanding nymph fisher himself, but Frank Sawyer, the inventor of the PTN, was a complete nymphing legend. The two men lived a mile or two from each other in Netheravon where Sawyer was keeper of the officer’s water on the famous

Bill Latham of Famous Fishing on a beat of the Avon near Sawyer's home
But Sawyer was more than just a great fly fisher – he was also an outstanding naturalist with keen powers of observation. There’s the story Sidney Vines relates in his book, Frank Sawyer – Man of the Riverside, of Sawyer walking in the snow one day with an old friend who pointed out a set of animal tracks to him and said, ‘I see the fox has been this way.’ ‘No, not the fox,’ said Sawyer, ‘the vixen.’

Sawyer applied his mind to studying mayfly nymphs and in particular, to imitating them as effectively as he could. This long process of pattern development gradually unfolded over many years and resulted in the creation of a number of successful patterns. But the Pheasant Tail Nymph, in my view, was simply a stroke of genius.

Frank Sawyer in a picture from his book
What I am going to tie here is the original pattern, just as Sawyer devised and tied it, taking the tying steps directly from his book Nymphs and the Trout (A and C Black, 1970). There are variations now, but few add real value and most miss the point – the PTN’s apparent simplicity was the product of years of observation and it is precisely this simplicity that adds so much to the fly’s universal success. I also think you will enjoy tying the PTN the way the master himself tied it, just for the sake of that alone. It’s like reliving a little of fly fishing’s more important history, or at least, one of fly tying’s great milestones.
What you will need to tie this fly
You will need fine copper wire. The hook will be a standard nymph hook, in sizes 14, 16 and 18. No tying thread is needed and the only other material is a cock pheasant centre tail feather.

Cock pheasant centre tail
A simple tip is to add the spool of copper wire to a bobbin holder. It makes handling easier.
Tying steps
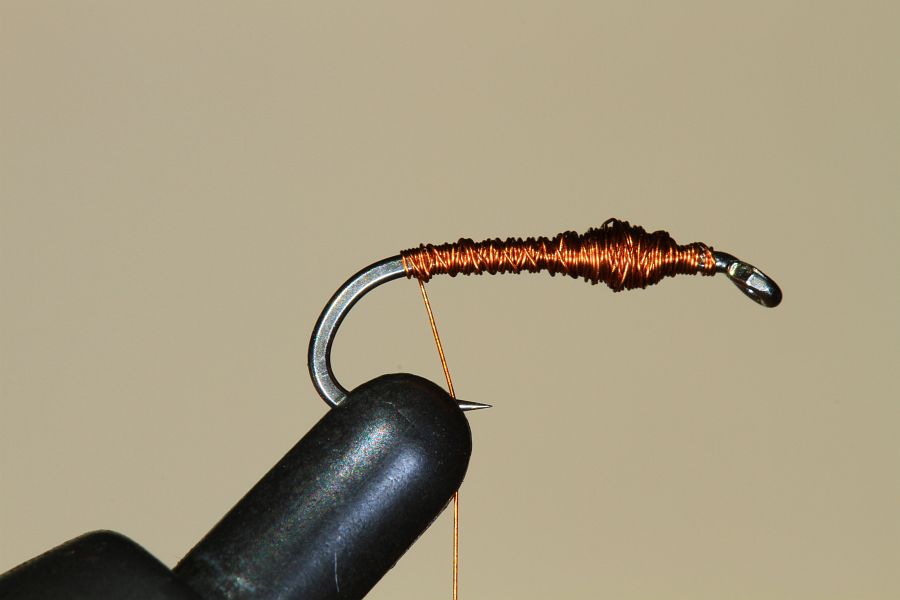
Dress the entire hook shank from front to back with an even layer of copper wire then wind the wire forward again to the thorax and build up a mound of wire at this point to form the foundation of a thorax.


The wire is then brought back to the end of the hook shank. You can leave it dangling here while you select four to six fibres from a cock pheasant tail feather. Cut these off near the stem. Hold the four fibres by their tips and secure them to the hook shank. They will represent the tail fibres and should protrude (according to Sawyer) about an eighth of an inch on a size 16 hook.

Now lift the remainder of the pheasant tail fibres and twist them onto the copper wire, forming a body rope.

Wind this rope evenly forward until you have covered the thorax. I leave a lot of the copper wire exposed simply because I am after the translucence it gives. Just behind the eye, release all four fibres from the wire and wind the wire back over the thorax so that it is positioned just behind the thorax mound.


Stretch the pheasant tail fibres back over the mound to represent the wing case and trap them with a turn of wire. Take the wire back to the eye of the hook again and once more stretch the fibres over the thorax and secure them with wire behind the eye of the hook.

By this time the pheasant tail fibres will have changed to a slightly darker colour (they are naturally darker towards the base), which is ideal as a trigger in an emerging mayfly pattern because just prior to emergence the wing case on mayflies darkens considerably.

Finished PTN with plenty of copper wire on show
The standard PTN

There is a variation Sawyer used in tying this fly where he finishes off just behind the thorax and not just behind the eye of the hook. I don’t really think it’s a variation as much as an example of his expediency. Depending on how long the pheasant tail fibres are and on what size hook you are using, it is possible that you may run out of feather at the back of the thorax and have to tie off here, or conversely, that you end up with enough over to add a third layer to the wing case.
Al Troth ties a well known variation on the PTN where he adds peacock herl at the thorax and pheasant tail legs and he ties the fly with brown tying thread. That is probably a more robust version of the PTN, because there is no way that you can knot copper wire, but it may not be as translucent.

Al Troth's version of the PTN tied with brown thread, with a peacock thorax and pheasant tail legs
Sawyer makes a big thing of translucency and he often studied his patterns under a microscope alongside the naturals he was trying to imitate. His view was the redness and shine in the copper wire wrapped around the pheasant tail gave the pattern translucency. He also pointed out that when a mayfly nymph is rising to emerge, its legs fold in alongside its body and are not visible. So he saw no use for legs in his imitations. Ever the pragmatist, Sawyer.
Fishing the PTN
This is a classic nymph pattern to use with the induced take, or the Leisenring lift, after a dead drift, possibly under a small indicator, but it also fishes well in New Zealand—rig style behind a heavier nymph or suspended under a dry fly. One of its advantages is that it penetrates the water surface very easily and sinks quickly. Another advantage in fishing to a sensitive trout taking nymphs is that it cause little surface disturbance when it lands.
***


