KEY AND CRITICAL STEPS TO TYING A GOOD ZAK NYMPH
I previously posted a series of pictures on tying the Zak, which, on reflection, could be improved on. The Zak, as Ian Cox rightly points out in a letter in the October November 2011 issue of Flyfisherman, is more a style of tying than a precise pattern, so there is room to use a variety of materials. However, the tying principles remain the same. We are after a dark, buggy, life-like fly that will represent a host of Baetid nymphs and have certain key triggers – movement, the right profile with a sparse, long tail, sloping abdomen, a clear thorax and a suggestion of legs.
MATERIALS
Hook: Nymph hook of your choice, but for this pattern I have used a Tiemco model 5212, size 14.
Bead: Glass, brass or tungsten; again your choice
Thread: 6/0 black
Under-thorax: Wool or lead wire if you are tying really heavy patterns.
Tail: Preferably the finer, barred fibres from a water mongoose skin. Alternatively use jackal or grey squirrel. I think cock hackles are too straight and stiff.
Body and thorax: Three peacock herls stripped of all flue, one plain peacock herl, purple DMC thread (green, or red, or blue DMC if you can’t get purple) and copper fuse wire.
Legs: Dun or any dark hackle, preferably genetic so the fibres are not too long.
TYING STEPS
Add a bead and dress the shank with silk.


Select the finer barred fibres from a water mongoose skin and pull them out with your fingers. This is better than using scissors when you tend to end up with too many fibres.

Hold the fibres in your fingers, remove the under fur and then remove any of the stiffer, longer fibres.


Measure these against the hook shank. The tail should be just a little longer than the hook length and it must be sparse.

Tie in the tail and then trim the butt ends.

Cut a strip of wool and unravel it until you have reduced it to one strand.

Attach this at the thorax area (roughly mid-shank) and use it to build up a thorax.

Tie off the wool. Note below where the tying thread is left afret wrapping on the wool. it is just behind the wool under-thorax.


Add the purple DMC thread.

Add the fuse wire at this same point.

Strip the flue off two or three peacock herls. Using your thumbnail pressed against the pulp of your index finger strip off the flue. It takes seconds to do. Tie these in by their butt ends at the same point as you tied in the wire and DMC thread.

Tie in a single plain peacock herl by the tip at the same point as the above.

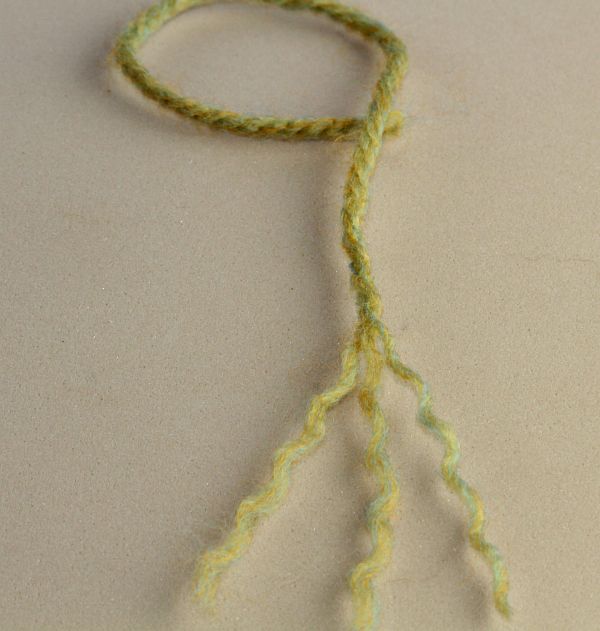
Hold the body ‘rope’, puling all the pieces gently towards your chest while wrapping them onto the side of the hook working right to the tail.


Take the tying thread back to the edge of the wool thorax. Gently twist (not too tight) all the components of the body rope. I used once to plait these pieces, but the effect is no better really and takes more time.
Once twisted, wind them forward to the thorax area and fix them here with your tying thread.

At this point select a dun hackle.

Use your fingers to splay the fibres along the hackle quill.

Strip all the fibres off one side of the quill.

Tie the hackle in by the tip at the beginning of the thorax area.

Bring the tip of the hackle forward and trap it just behind the bead with tight wrap of thread.

Now when you trim off the excess hackle tip you will notice you have left a ‘free’ set of ‘feelers’ that are conveniently pointing forward! Something of a bonus!

Bring the body of the hackle alongside the rope. It’s easier to hold all these components with a pair of rotating hackle pliers than with your fingers.


Gently twist them. Notice how the hackle fibres immediately splay out in different directions, giving an added buggyness and naturalness to the pattern.


Tie off right behind the bead and trim the excess'rope'.
The finished fly.